
I work for a company that does AI, and so I’ve been neck-deep in lots of AI projects over the past few years. I’ve had a ChatGPT subscription, and more recently I use Claude. I’m downright marinating in AI.
The most remarkable thing I discovered was how accessible LLMs are. I was able to install ollama on my Mac Studio M1 and run a 16B parameter model. Slowly, mind you, but I could run it without quantization. That’s interesting.
Over the past couple years, I’ve spent more and more time building AI apps. Most of them have been for myself, some I’ve shared with friends. “Small” AI models are a fascinating kind of glue between fuzzy inputs and outputs: they take natural language and other imprecise data and transform it into other kinds of generally-loosely-structured outputs. Small models usually end up facing trade-offs:
More parameters means higher quality (better “intelligence”), but more memory use
Stronger quantization means lower quality, but lower memory requirements
Specialization (thinking, more robust function calling) usually comes with the disadvantage of taking away other kinds of capabilities or less of a focus on a broader range of training data.
I could run larger models on my Mac, but they were painfully slow. I could increase the quantization, but then it starts to glitch out and grow less coherent. I could reduce the parameter count, but the model gets dumber.
Time for a homelab
I’ve always wanted a homelab, but always assumed it would come in the form of a Mac Mini. Not this time. I wanted something that could run real AI models. I work in AI, I should be a proper AI lad with AI hardware.
I spent a lot of time planning this out. The high-level specs:
Asus Pro motherboard
AMD Threadripper Pro 7000
128gb DRAM (4x 32GB)
Dual 40GB A100s (with nvlink)
A 4U chassis in a 12U rack
Claude helped me plan out the build, which was a weird moment of vulnerability because I was spending a substantial amount of money trusting an LLM to get it right. The biggest risks were the A100s, which I sourced through eBay: you essentially get a 30-day return window. If I wasn’t able to get the build working within a couple weeks of everything arriving, I wouldn’t be able to return the parts.
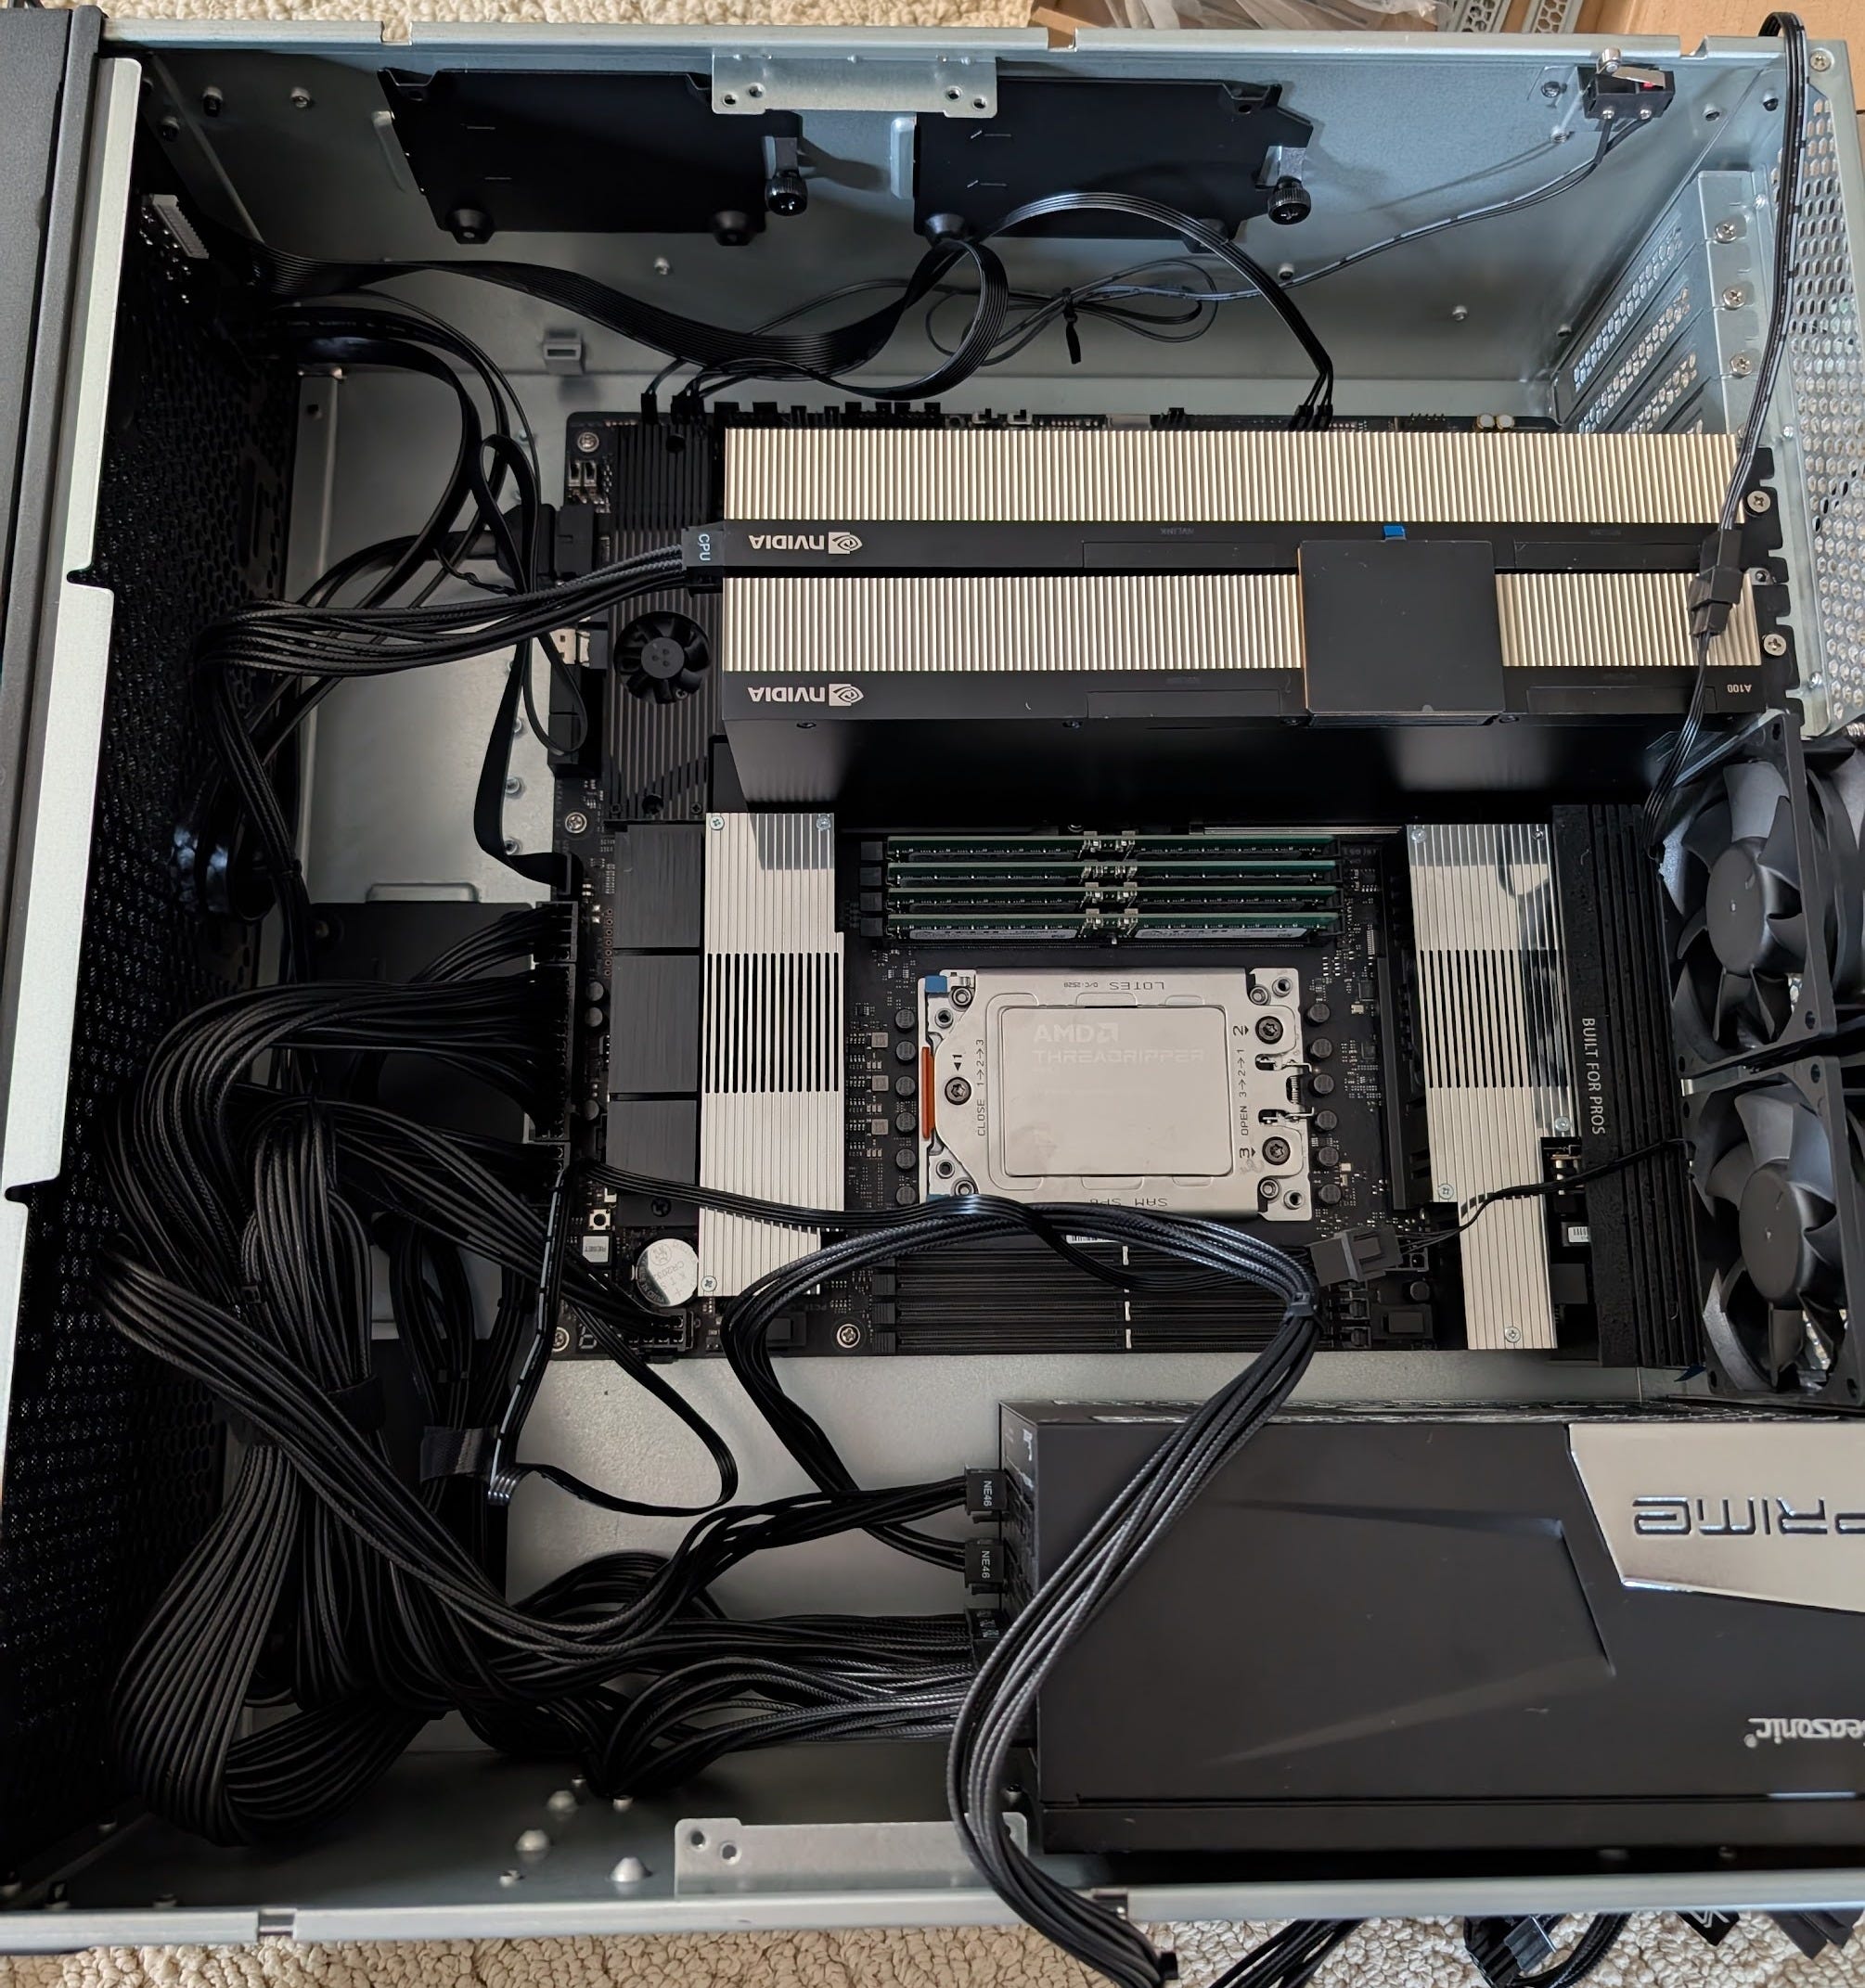
Surprisingly, there were only a handful of hiccups.
The CPU cooler was too big for the chassis. I ended up having to buy a smaller one.
Extra fans needed to be installed on the front of the chassis to drive enough airflow.
The A100s do not like being in this enclosure. They need a high static pressure fan blowing into them to keep them cool.
The blower for the A100s was the most challenging part, because even after sourcing the fan, it doesn’t attach to the back of the A100s. Fortunately, there’s some guy who sells 3D printed shrouds that attach two A100s seated next to each other to a 40x40mm fan. Bless you, good sir.1 I did need to modify the shroud slightly with a mitre saw because the motherboard sits a bit too close to the bottom of the A100s.
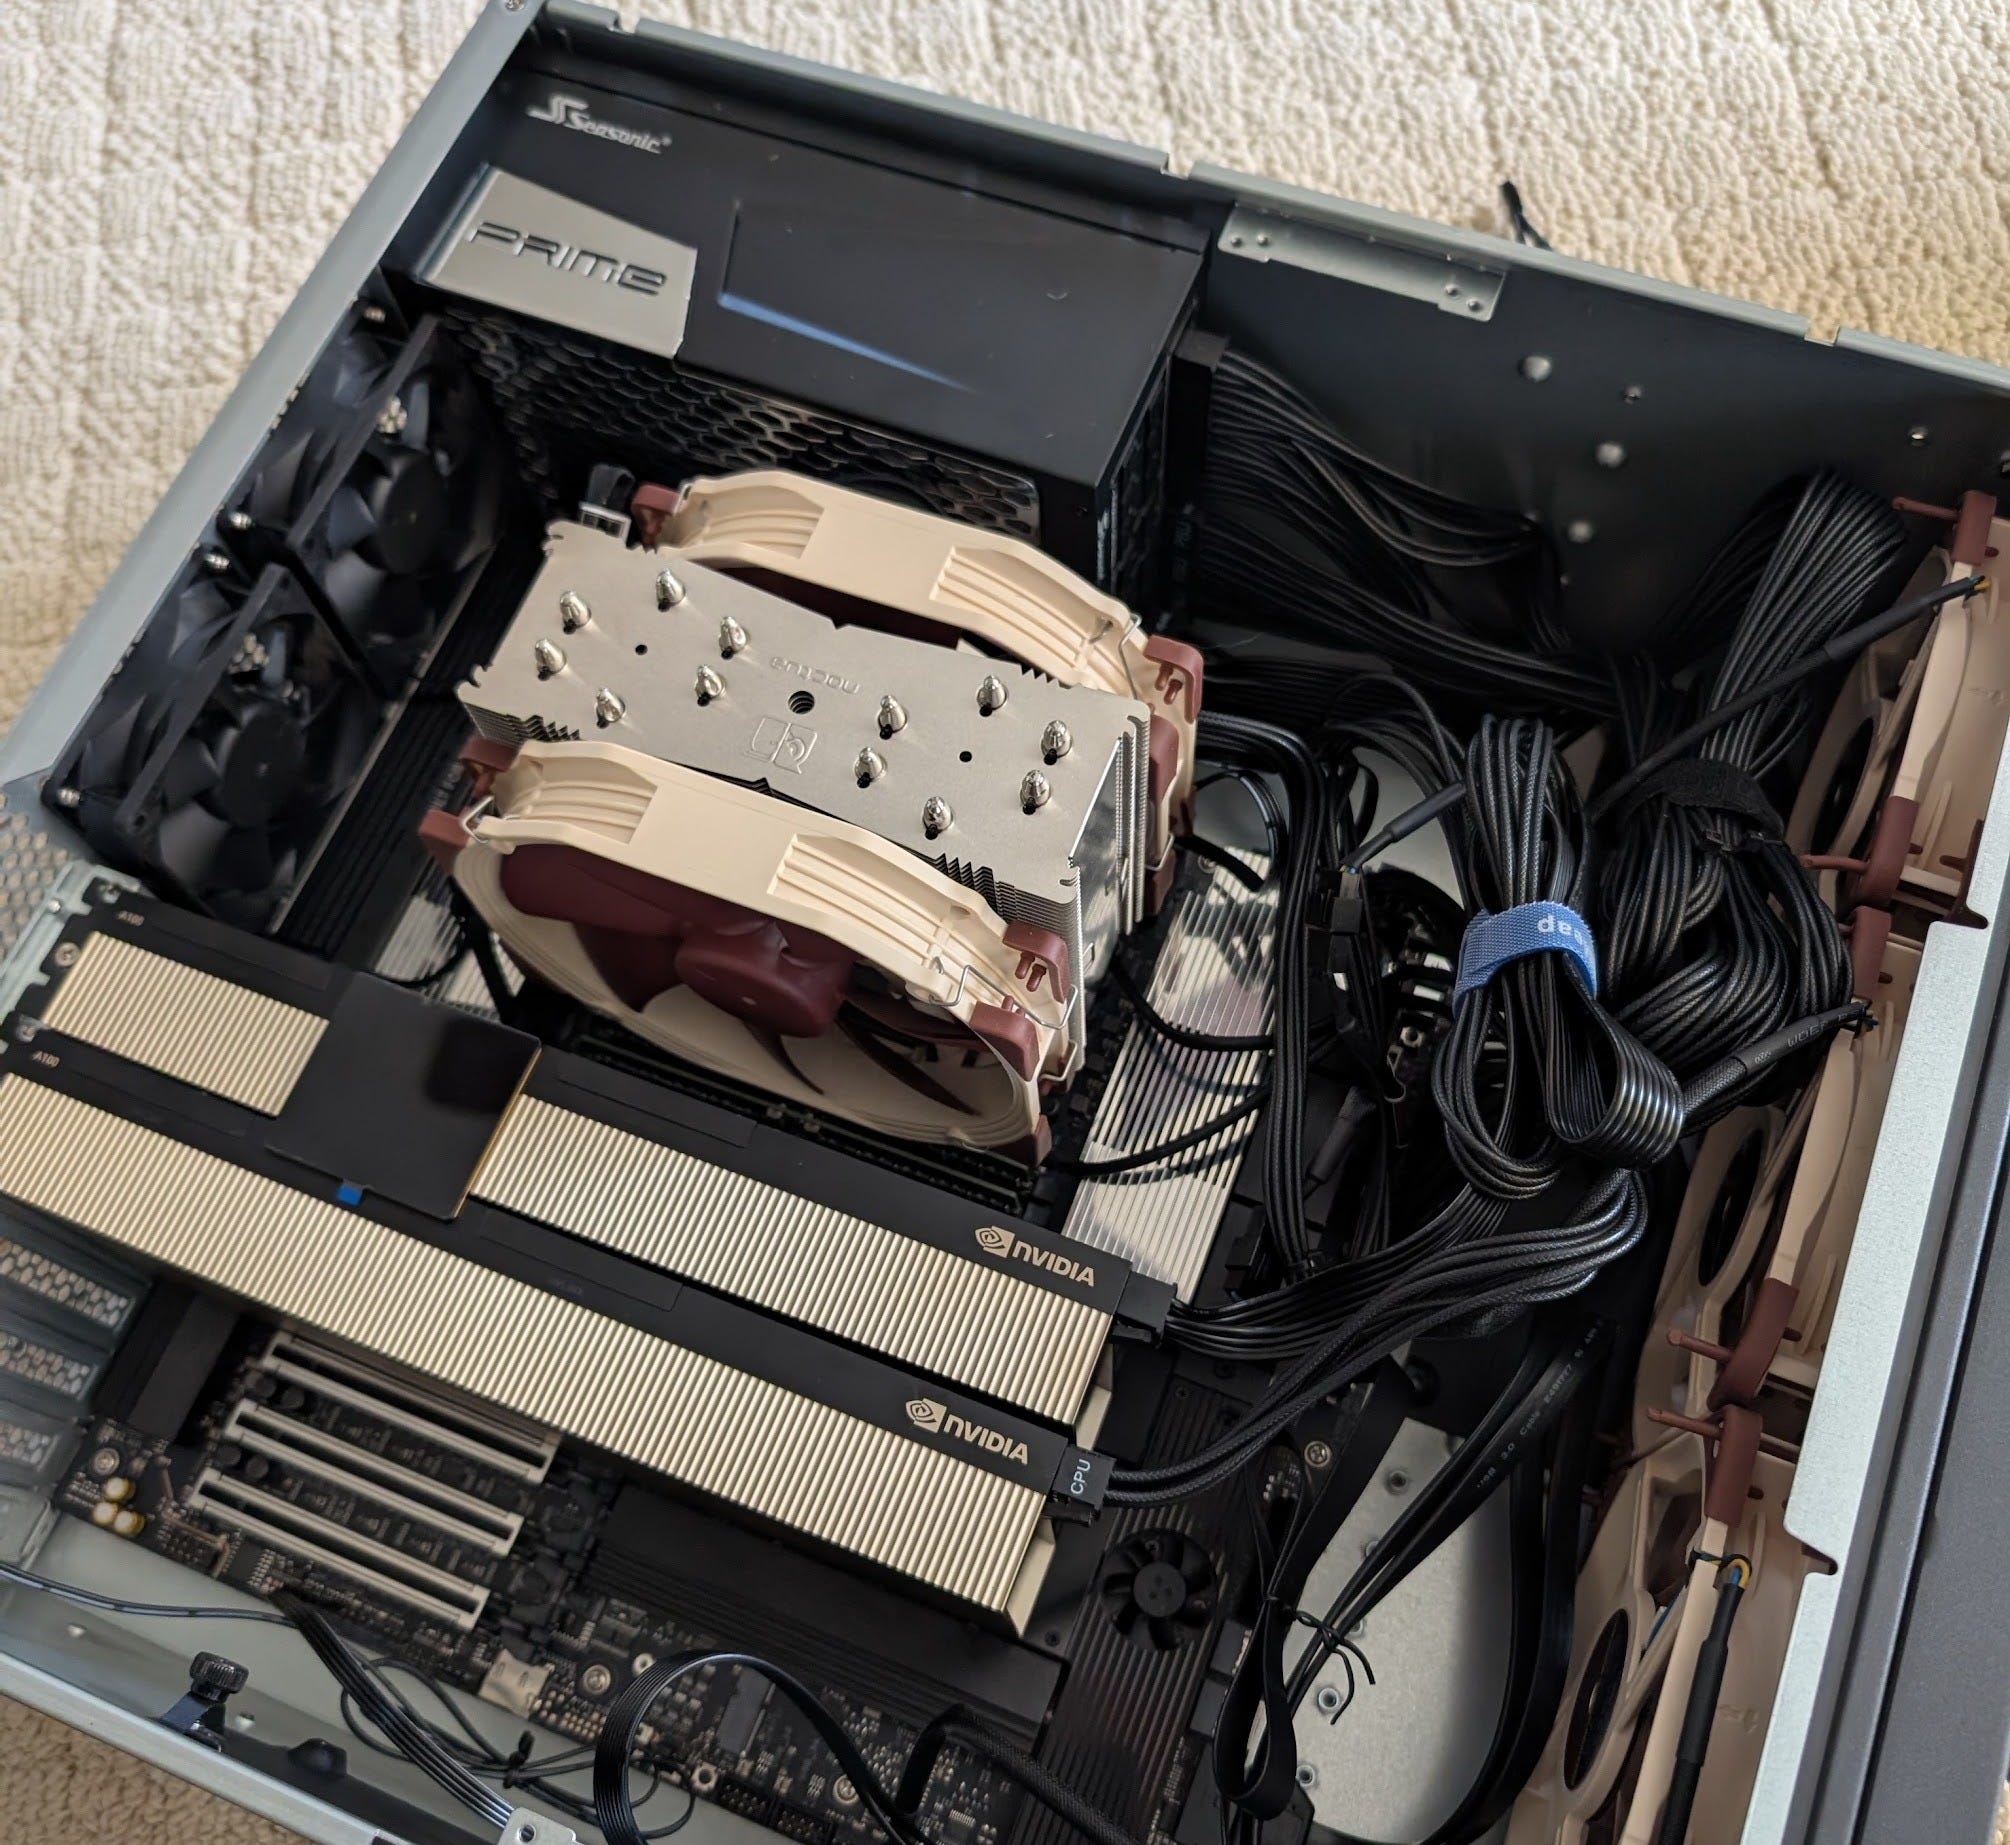
Turning it on
I booted the thing up and was pleasantly surprised that it made it through POST on the first try.
Next challenge: no monitor.
The motherboard has Display Port output, but those A100s can’t drive it. And the CPU has no integrated graphics. I wasted a bunch of money buying adapters for VGA before I gave up. I considered adding a dinky little GPU, but it’s yet another thing that can go sideways. The better option was the motherboard management interface.
The management interface is a bonus ethernet port on the motherboard. Connect it to your computer’s network card, then configure your computer to be on the same subnet as the motherboard’s hard-coded IP address (10.10.10.10 on my unit). Then you just open http://10.10.10.10 in your browser and you get a beautiful UI2 that gives you access to the system.
The most useful feature of this UI is the ability to remote desktop into the machine. You get a web UI that gives you terminal access. It’s not good, but it’s sufficient. You can even attach an ISO file in the browser UI and it’ll mount on the system—perfect for loading Ubuntu without having to dig out a flash drive.
This got me through the process of installing an OS, and I was able to connect it to the network and install Tailscale.
Naming it
The most important step of setting up any new computer—especially a server—is choosing a good hostname. In a world of cattle and pets, this machine is a pet. It needs an extra good name.
When I was in college, we had a bunch of old Sun Microsystems machines that a professor had gotten with a grant. Apparently college professors make a hobby out of writing as many grant applications as they can in the hope that they actually get one. The professor had lovingly named the computers Ron, Harry, and Hermione (corresponding to their specs). Another grant had landed the department a computer with a fancy GPU3, and that one was named Dumbledore. The charming names made it fun to work in the lab and do your homework.
I wanted a name for this server that was fun, but also funny. One night, after accidentally double-dosing myself with melatonin, I woke from a vivid dream where I was being forced to eat too many saltine crackers. I had it: I’d name the server Daddy.
“Daddy” is, as it turns out, just about the most inappropriate name you can give to a computer that you talk about at work without being vulgar. “After work I’m going to open up Daddy and rearrange his insides.” “This weekend I’m going to see if I can get Daddy mounted in a rack.” “I’m making a special crate so that Daddy doesn’t bounce around in the trunk while I drive him to his final resting place.”
The software setup
The first thing I installed was Tailscale. If you haven’t used Tailscale before, it’s like a peer-to-peer VPN between your individual machines. I can ssh matt@daddy and instantly connect, so long as both computers can reach the internet (no port forwarding!). It’s free for personal use for more devices than I think I’d ever need.
I’m running Coolify, which is a system for managing Docker containers. It’s straightforward to set up so that pushes to your Github trigger builds and deployments of applications. I can work on a project on my Mac Studio, push to Github, and a minute or two later it’s running on Daddy.
To make it more convenient to access the various services that I have on Daddy, I run traefik plus a DNS resolver. This lets me hit http://grafana.daddy to access Grafana, or http://coolify.daddy to access the Coolify dashboard itself.
With few exceptions, I’ve dockerized just about everything that runs on Daddy. I’ve had VPSs before and there’s always “dust” lingering around the filesystem where you’ve installed or changed or removed things. I don’t want any crap cluttering up the system, so everything goes in a container.
AI workloads
For the AI workloads, I’m using vLLM and llama.cpp depending on which model I’m using. I’d prefer to be all-in on vLLM but occasionally I run into a model which isn’t compatible. Easy enough!
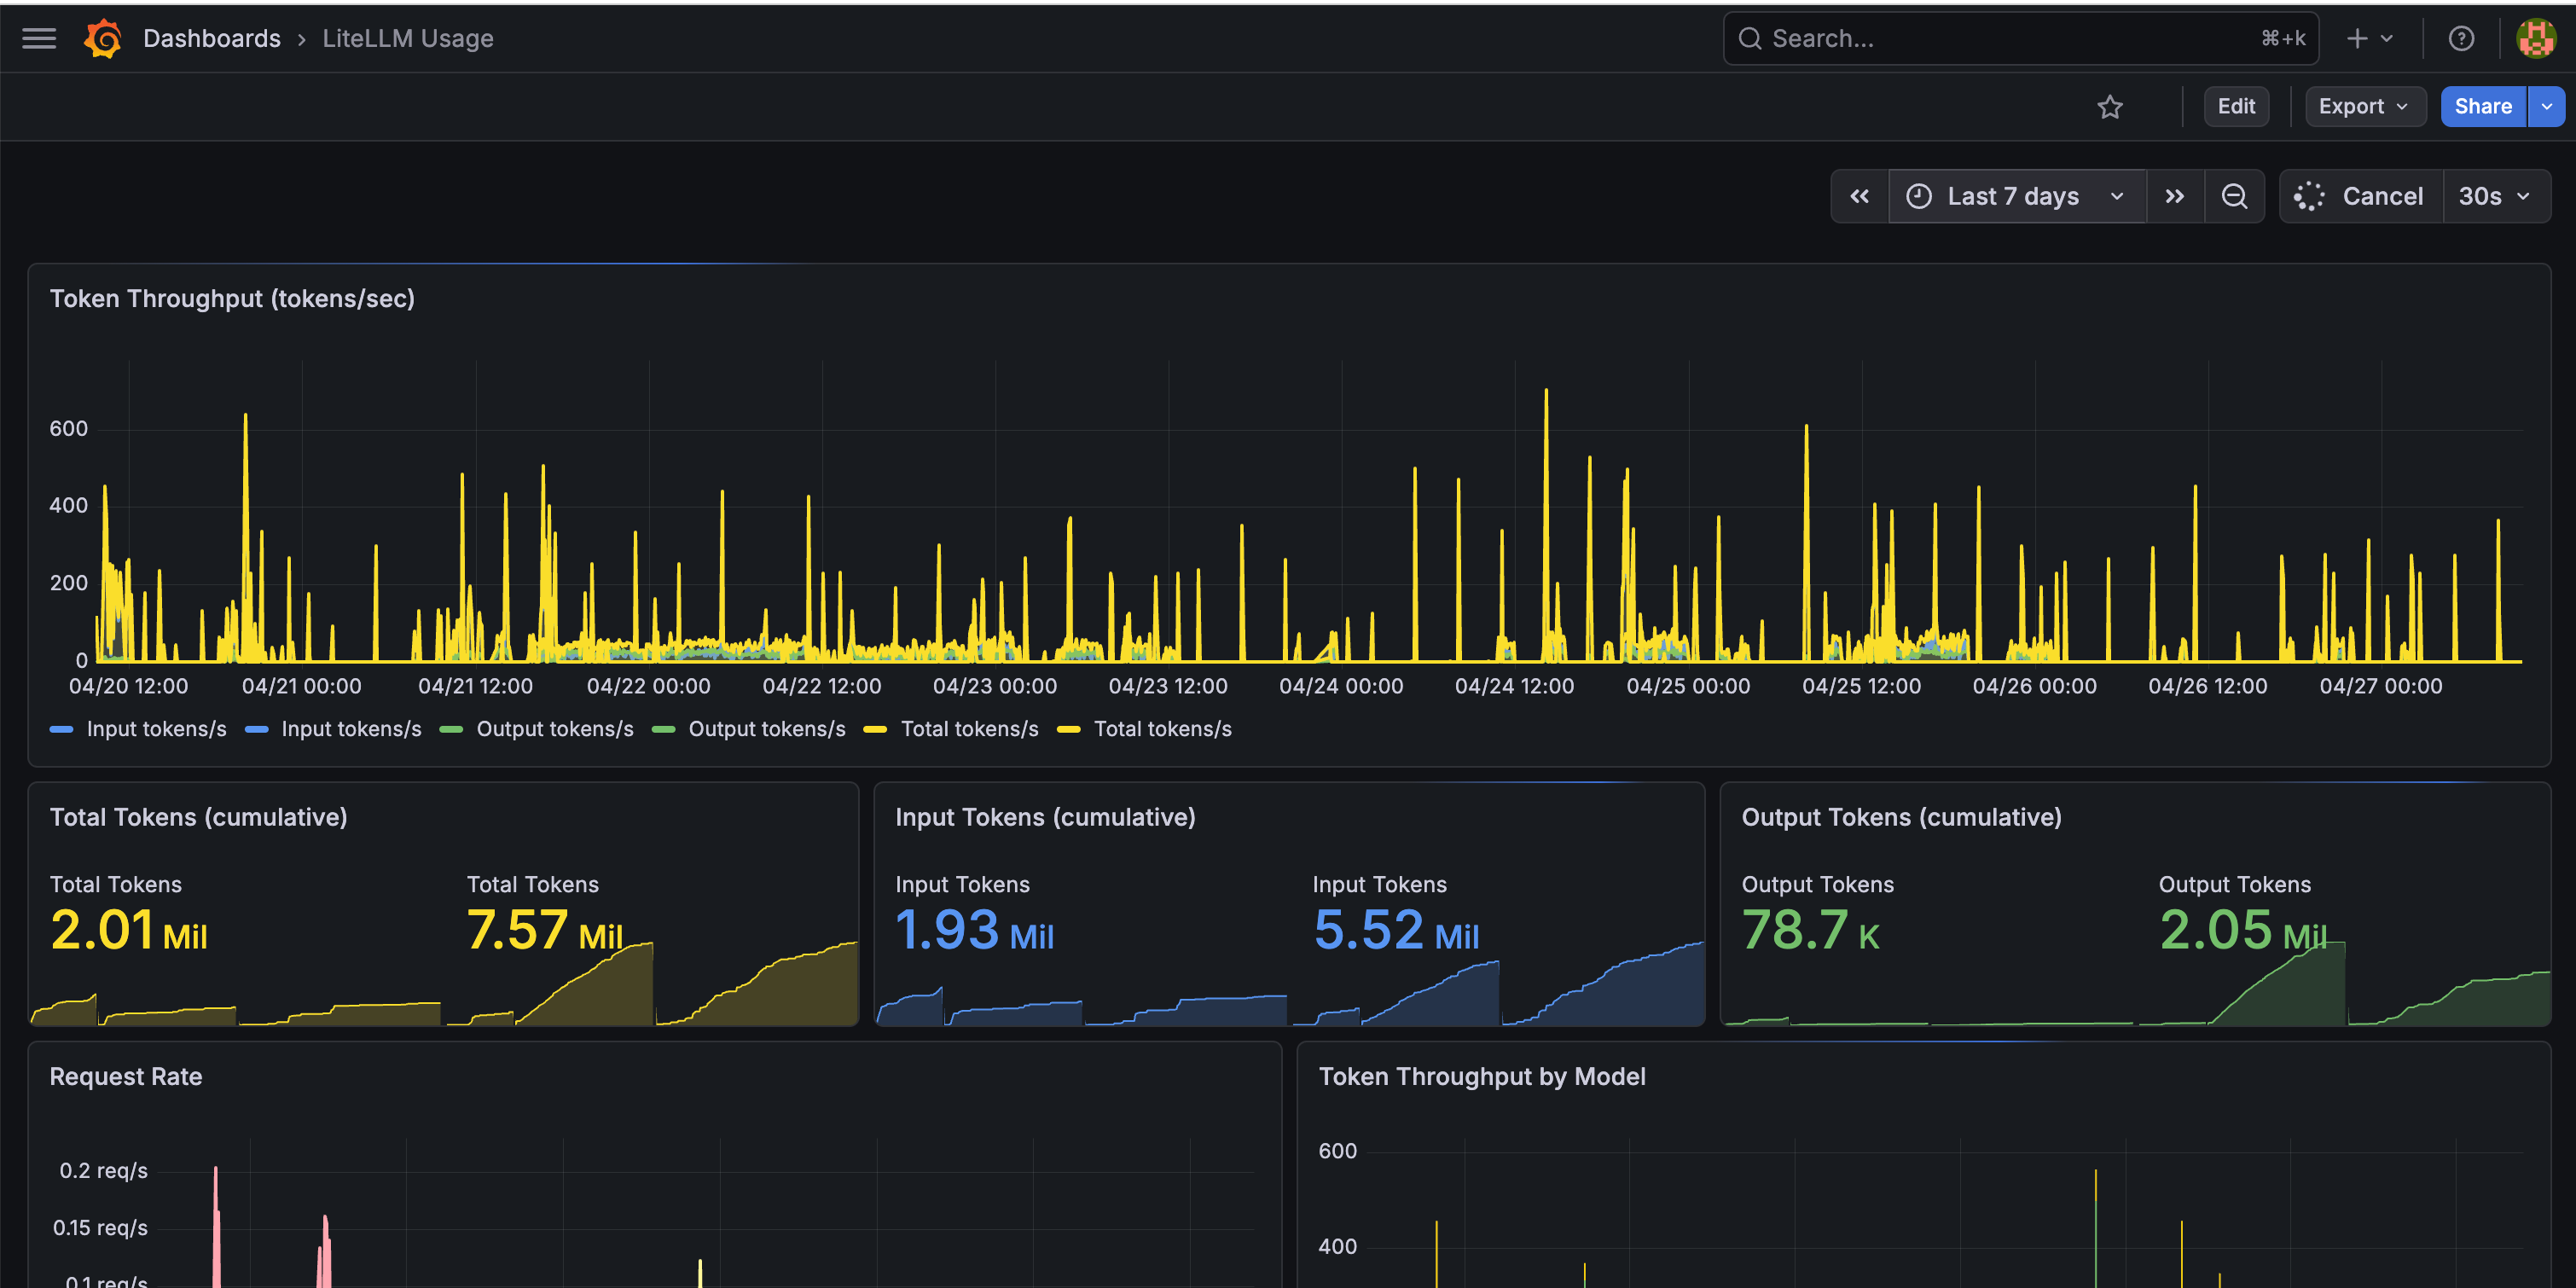
Both of these sit behind LiteLLM. Besides giving one consistent, stable API, it means I don’t need to worry about pointing my applications at different ports as I spin up new containers. It also exposes prometheus metrics for Grafana, which is very handy for debugging.
Connecting Daddy
At home in Raleigh, it was easy to get Daddy set up. I have my home wired with cat-6, and I simply connected him to the nearest switch. This isn’t a good long-term setup, though, and one of the reasons why I put off the project for so long.
For one, Daddy is loud. The high static pressure fan in particular is especially loud. About as loud as a hair dryer. For the few days I had him in Raleigh, I had to keep my office door shut (and I could tell my partner’s patience was wearing thin). A second, more minor problem is heat. Daddy is basically an expensive space heater when he’s under load. During the winter this isn’t a problem, but the last thing I need is something warming up my home.
I considered putting him in the attic or the crawlspace, but both are either too hot or cold, or have too much moisture. I considered the closet in my office, but the constrained space isn’t ventilated. There’s no climate-controlled space in my house that’s also fine to have a loud-ass computer running in.
I’d realized, though, that the perfect spot is actually at my cabin in western North Carolina. The cabin has a finished basement that’s partially below ground. It stays in the mid 60°s most of the time, and it’s not a space where we spend really any time at all. Plus, I’m not at the cabin most weeks. The big challenge, though, is connecting Daddy to the internet.
I’d had Frontier internet at one point at the cabin, which is the only wired provider available. They advertised it as “1gbps fiber”, but on installation day I was very dismayed to learn that it’s twisted pair (glorified DSL) from fiber at the edge of the neighborhood. I could hardly pull 30mbps down.
A month after I closed on the cabin, Hurricane Helene hit, knocking out internet. One month after the storm, the internet was still out, and Frontier gave me the runaround trying to charge me for service that I was not receiving. I canceled my service in anger (never again, Frontier!!) and switched to Starlink, which was offering discounted antennas for folks affected by Helene.
Starlink posed a new, interesting challenge. I have a roofline mount for the antenna. The cable runs down my roof and into a second floor window. The router is in my loft. This poses a problem: how do you connect a server in the basement?
Running a network cable through the exterior walls is essentially a non-starter. It’s a log cabin.
Below the loft, there’s no interior walls that can handle the cable.
To access the nearest interior wall, I’d either need to run the wire through the floor (not happening) or over the top of the vaulted ceilings (also probably not happening).
One option is to route the antenna cable through a different window and move the router to the other side of the cabin into the room I use as my office. This could work, and it’s a straight shot down through an interior wall to the basement (the same wall that hosts the return duct for the HVAC). This is a lot of work, though, and I have hesitation about cutting exploratory holes in the wood paneling on the walls.
I went with the simplest option: wifi.
Here’s the thing: the wifi isn’t the bottleneck, the Starlink is. Even on a bad day, the wifi isn’t the bottleneck. It’s wifi 6e, with a theoretical upper limit of nearly 10gbps. The Starlink pulls about 300mbps down. The little bit of extra latency from the hop isn’t something I’ll lose sleep over.
I bought an Alfa Networks 802.11axe USB adapter, thinking that a good external adapter would mitigate the downsides of being inside a metal rack. First, its integrated bluetooth was outright broken, requiring me to denylist it in the system settings. Then, the damn thing died after the system rebooted. I’ve never had a peripheral turn itself to e-waste in so little time.
I drove to Walmart before it closed and picked up a cheap Netgear Nighhawk adapter. Worked on the first try.
Up next in part 2
What I’m running on Daddy
Daddy’s tiny friend
Making the wifi reliable
Monitoring climate
In a pinch, you can construct your own shroud out of some cardboard and tape.
If you’re nostalgic for the web interface for a Linksys WRT54G router, you’re in luck!
At the time, I’m not sure anyone had actually gotten the drivers to work.
Let's hear more about Daddy!
Very cool. How much did it cost? Why do you "need" such a powerful machine?